A few months ago, during an internal infrastructure penetration test, the network printers played a very important role in the assessment. What initially looked like a not-so-important low severity finding turned out to be the key to fully compromising the Windows domain the printers were attached to.
To set the scene - once we performed the initial reconnaissance on the in-scope network, we identified a few network multifunction printers - the ones you typically expect to find in an office network. They may not be the most critical components, but in a typical Foregenix spirit of leaving no stone unturned, we set off to identify any vulnerabilities these devices may expose.
Access to the configuration portal
As is usually the case, we identified that the management password was still the default on one of those printers, which gave us access to the web based configuration portal.
The printer offered a number of features and was fully configured for use in the environment it was placed in. For example, a contact list on the printer contained a few valid emails related to the employees so that scanned documents could be sent directly to someone’s email- useful for day-to-day office life and interesting for the penetration tester.
Even more interesting was the fact that some of the entries were not listed as “email” type, but rather as “server”. These were service accounts' credentials that the printer would use to store the scanned document within a network location, i.e. FTP servers or SMB folders. A penetration tester’s first reaction would be to click the ‘Edit’ button hoping to get some juicy information about those credentials stored within the printer - but things were not going to be that simple.
Next Step: catching an early flight
A deeper look into the other features offered by the printer identified a data export functionality that provides a CSV file containing the contact list. Things got interesting when we noticed two columns in this extract - MFUSER and MFPASSWD. Both columns were filled in with a cleartext username, the same we could get from the web interface, and an encrypted password.
We obviously won’t show the real credentials in this blog post of course, but this is more or less what we discovered:
| MFUSER Column value | MFPASSWD Column value |
| user | pTSmpj== |
| admin | Mz9lMJqyozy4 |
A bit of Googling rendered a plaintext-ciphertext pair courtesy of a curious user in a support forum who wanted to know more information about the encrypted fields of the exported file of his printer, using the following example:
| Plaintext Password | Ciphertext Password |
| xerox | rTIlo3t= |
Source: https://community.spiceworks.com/topic/535776-fuji-xerox-printer-password-encryption-in-address-book
If you are familiar with basic cryptography, it’s likely you noticed two suspicious things by now: these don’t look like classic strong hashes and the length of the ‘encrypted passwords’ is different.
Around that time we were getting close to the end of the day (or rather end of the night since this was an overnight engagement) and we had a flight to catch first thing the next morning: there is nothing like a bit of offline time to rest the eyes and the brain, right? Well…no.
We knew that testing wouldn’t start again till that night, plus we had the whole flight to keep ourselves entertained. So, in the absence of Sudoku, we decided to have a crack at those encrypted passwords again from the comforts of economy class.
The first step we took was to decode them from BASE64 and see whether the decoded text corresponded to the plaintext password - ok, we had already tried this the night before and we knew they were not:
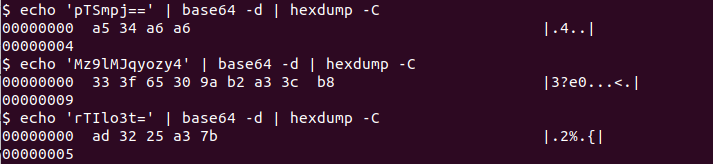
Well, those are not even printable characters so it definitely wasn’t a simple BASE64 encoding.
It was a good thing we had the known plaintext-ciphertext tuple since that allowed us to perform some basic analysis and test a few different scenarios. So here we go:
To start with, we looked at the hex representation of the ASCII characters of the BASE64 encrypted password: rTIlo3t=
72 54 49 6c 6f 33 74 3d
| ASCII | r | T | I | l | o | 3 | t | = |
| HEX | 72 | 54 | 49 | 6c | 6f | 33 | 74 | 3d |
If we simply decoded it using BASE64 we got the following:
ad 32 25 a3 ab
The above BASE64 decoding actually contained non printable characters but could still play some role in trying to “crack” this encryption method.
From our Googling above, we knew the plaintext password was 'xerox', which when BASE64-encoded becomes '65 47 56 79 62 33 67 3d'.
While we were trying to define the next step, we noticed that each character of the BASE64 values (the actual ciphertext and simple BASE64 encoding) were suspiciously close together. So the next step was naturally to define exactly what the distance between the 2 was, and to make things easier to the human eye, we transformed each value from HEX to DEC:
| ASCII | Hexadecimal | Decimal |
| rTIlo3t= | 72 54 49 6c 6f 33 74 3d | 114 84 73 108 111 51 116 61 |
| xerox | 65 47 56 79 62 33 67 3d | 101 71 86 121 98 51 103 61 |
When converted to a base 10 system, our eyes could easily confirm that each plaintext value was very close to the ciphertext one, so, let’s subtract one from the other:
114 84 73 108 111 51 116 61 -
101 71 86 121 98 51 103 61
----------------------------
13 13 -13 -13 13 0 13 0
Bingo! There was definitely a correlation here, it looked like a simple algorithm with a key=13 and a few rules applied.
With this information in hand, we tried to decrypt the other two passwords extracted from the CSV file, by adding or subtracting the value of 'D', which is 13 in hexadecimal (we decided to ignore the BASE64 padding). So starting with the password 'pTSmpj==' we have:
| ASCII | p | T | S | m | p | j | = | = |
| HEX | 70 | 54 | 53 | 6D | 70 | 6A | 3D | 3D |
| HEX - D | 63 | 47 | 46 | 60 | 63 | 5D | 3D | 3D |
| HEX + D | 7D | 61 | 60 | 7A | 7D | 77 | 3D | 3D |
We were still not sure when the key was added and when it was subtracted, but we noticed that the first row, obtained by subtracting the key, printed the following content when decoded in BASE64:
pa\
This was because only the values highlighted below correspond to valid BASE64 characters:
HEX -D: 63 47 46 60 63 5D 3D 3D
We had two incorrect values there and we needed to do something about it. If we look at the other row (obtained by adding the key) we noticed that they actually had valid BASE64 in those positions!
HEX +D: 7D 61 60 7A 7D 77 3D 3D
So we decided to merge the two (why not?!):
63 47 46 7A 63 77 3D 3D
Which in ASCII is 'cGFzcw==', and this is now valid BASE64 content that, when decoded, gives us: 'pass'
We made it! First password was recovered!
So let’s do the same with the second one (the 'admin' user) - we moved each character to its HEX equivalent, we added and subtracted 13 (D in HEX) and picked up valid BASE64 values:
| ASCII | M | z | 9 | 1 | M | J | q | y | o | z | y | 4 |
| HEX | 4D | 7A | 39 | 6C | 4D | 4A | 71 | 79 | 6F | 7A | 79 | 34 |
| HEX - D | 40 | 6D | 2C | 5F | 40 | 3D | 64 | 6C | 62 | 6D | 6C | 27 |
| HEX + D | 5A | 87 | 46 | 79 | 5A | 57 | 7E | 86 | 7C | 87 | 86 | 41 |
Handpicking the valid BASE64 values (highlighted in blue above) and converting to ASCII we obtain 'ZmFyZWdlbmlA', that, when BASE64-decoded, gives us: 'faregeni@'
This could actually be the password! But it looked more like a word we know very well: 'foregenix', which in BASE64 encoding becomes 'Zm9yZWdlbml4' (differences highlighted in red).
So an interesting finding was that in the algorithm used, two instances the character in the encrypted password were not modified.
(Remember, this is just a working example with a fictitious password to protect the innocent)
Anyway, we had our 2 passwords and we couldn’t wait for the testing to resume so that we could try them out...
From the printer to the domain
Testing resumed and we tried the passwords - we were correct! The two passwords worked and the icing on the cake was that one of those was a Domain Administrator - jackpot!
The client was completely surprised and finally happy to have this bomb defused before someone else could take advantage of it.
The encryption algorithm was later identified as a ROT13, which simply shifts characters of 13 positions and does not provide any real protection in terms of confidentiality. A small script was developed to help in identifying and exploiting the issue in future tests (link below).
We also communicated with the vendor who quickly addressed the matter, identified all of their affected products and released a patch, which you can find linked below as well.
Conclusion
We often hear how every small detail matters when speaking about security and we think this was a nice and fun example to demonstrate it. A number of small issues were identified and chained together to ultimately reach a full domain compromise and it all started with an often overlooked default password on a printer.
We hope you enjoyed a bit of rather simple cryptoanalysis - we had a lot of fun testing and sharing this.
Vendor reference:
https://www.fujifilm.com/fbglobal/eng/company/news/notice/2022/0302_addressbook_announce.html
CVE ID Reference:
https://cve.mitre.org/cgi-bin/cvename.cgi?name=CVE-2021-43774
Below is the python script to automate the process of obtaining valid credentials from a vulnerable printer: https://github.com/foregenix/defuji
Giuliano Fasto April 29, 2022
19 MIN READ